“`html
Why Saltwater Boards Sink Faster Than Freshwater Ones
I’ve paddled Puget Sound for nearly a decade now, and saltwater treats your paddleboard like a slow-motion demolition project — honestly, I learned this the hard way. My first SUP, a budget-friendly inflatable I thought would last forever, started getting heavier around year two. By year three, it was absorbing water like a sponge. The problem isn’t just salt. It’s the combination of salt, Seattle’s relentless moisture, and the way marine environments break down board materials from the inside out.
Here’s what actually happens: saltwater infiltrates paddleboards through osmotic blistering and foam degradation. When saltwater penetrates the outer shell, it creates a concentration gradient between the fresh foam core and the salt-saturated exterior. Water molecules migrate inward — basic physics. The foam absorbs this moisture and expands. Usually 18 to 36 months pass for boards paddled regularly in Puget Sound before this becomes catastrophic enough that your board won’t float properly anymore.
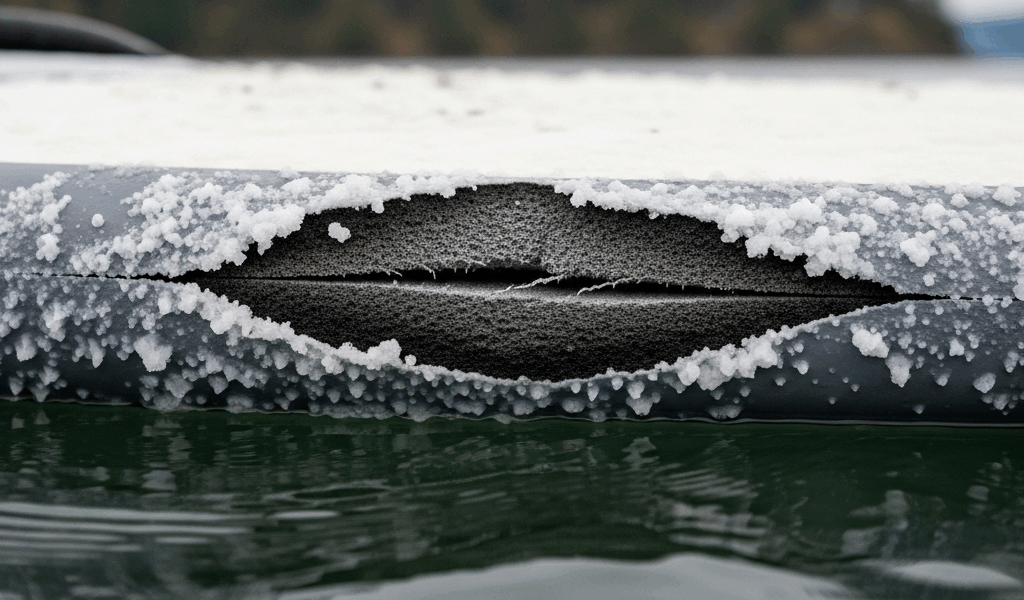
Osmotic blistering is the visible culprit you’ll actually see. Tiny white spots or raised bumps form on your board’s surface, typically clustered on the bottom where saltwater contact is most frequent. They’re not cosmetic. Each blister represents a pocket of saltwater actively deteriorating the material beneath. My first board developed maybe five of these blisters one summer. By the following spring? Dozens.
Seattle’s climate accelerates this dramatically. Rainfall averages 38 inches annually, and salt spray from Puget Sound reaches several miles inland. Temperature swings between 35°F in winter and 75°F in summer create expansion and contraction cycles that stress board materials continuously. Fiberglass and epoxy resin — standard construction materials for hard SUPs — aren’t designed to handle this repetitive stress combined with constant salt exposure. The resin becomes brittle. Micro-gaps form at the seams and dings. Water finds these entry points.
The internal foam is particularly vulnerable because most paddleboards use expanded polystyrene (EPS) or polyurethane foam. Both materials resist water initially — they’re hydrophobic by nature. But saltwater degrades the cellular structure over time. Once water breaches the outer shell, the foam absorbs it like nothing else matters. A single ding or hairline crack can let in enough saltwater over a few weeks to add 10–15 pounds of water weight to your board.
Check for Delamination and Micro-Cracks First
Before you panic, assess what you’re actually dealing with. Most sinking issues start small and compound quietly. You won’t wake up one morning to a board that’s suddenly waterlogged. Instead, you’ll notice it takes more effort to paddle, or it sits lower in the water than it used to.
Start with a visual inspection. Stand your board on a flat surface and look at the bottom, sides, and top rails carefully. Probably should have opened with this section, honestly — I wasted two weeks trying complex fixes before examining the board properly. Look for white spots, discoloration, or areas where the surface feels slightly raised or soft. Run your hand along the seams and feel for gaps, separations, or roughness that wasn’t there before.
Next, perform a sound test. Tap the board gently along its length using your knuckles or a soft mallet. A healthy board sounds crisp and consistent. If you hear dull thuds in certain areas or notice the sound changes dramatically in one section, you’ve likely found a moisture pocket. Some soft spots will feel squishy when pressed moderately — don’t apply heavy pressure, just enough to gauge give-and-take.
The flex test helps identify where the structure is compromised. Stand the board on its rails, balanced on its edges. A strong board feels solid and shows minimal flex. A waterlogged board flexes noticeably, sometimes unevenly. If one section flexes much more than others, water has likely infiltrated that area and degraded the foam’s integrity.
For delamination specifically — where the top layer separates from the core — look at the rails and edges. Peel back any loose fiberglass if you see it separating. You might also see white foam exposed where the outer shell has cracked or split. These are all entry points. Saltwater will actively wick into exposed foam, turning a small problem into board-wide saturation within weeks.
Document what you find with photos before attempting repairs. This helps you track whether the issue is spreading and serves as reference material if you decide to take the board to a professional repair shop later.
Dry Out Your Board Properly After Each Session
This is prevention disguised as recovery. How you treat your board immediately after paddling determines how quickly it succumbs to saltwater degradation.
Rinse your board with fresh water immediately after leaving the salt. I mean immediately — use a hose at home or hit a public water fountain near the boat launch. Spray the entire surface, top and bottom, paying special attention to seams, dings, and any visible cracks. Saltwater left on the surface continues its corrosive work. Fresh water dilutes the salt and prevents it from crystallizing as the board dries.
After rinsing, stand the board upright on its tail in a protected area. Lean it against a wall, in a garage, or under a carport. Never lay it flat on the ground — this traps moisture between the board and the surface. Standing vertical allows water to drain away from seams and dings instead of pooling in them.
Avoid direct sun while drying. This sounds counterintuitive, but sun exposure accelerates osmotic blistering in saltwater-exposed boards. The heat causes the resin to expand, creating tiny gaps where water can penetrate deeper. Air dry in shade or indoors instead. It takes longer — sometimes 24 to 48 hours depending on humidity — but it’s worth the wait.
For the rainy months typical in Seattle (October through May), consider storing your board indoors during off-season. Keep it in a temperature-stable environment, ideally between 50°F and 70°F. Basements work. Unheated garages are acceptable if they’re dry. Store the board vertically or suspended horizontally on padded supports to prevent stress points.
Never leave your board wet overnight outdoors. I learned this during my first Puget Sound season when I left my board drying in the driveway overnight, then it rained. The board absorbed water, and that moisture trapped inside created perfect conditions for foam degradation over the next few months.
Seal and Repair Small Leaks Before They Spread
Once you’ve identified damage, action matters. Small problems become expensive fast.
For hairline cracks or micro-splits on the surface, marine epoxy sealants work effectively. Solarez or general-purpose two-part epoxy designed for fiberglass work well. Clean the damaged area thoroughly with a damp cloth and let it dry completely. Sand the immediate area lightly to help adhesion. Apply the epoxy according to product instructions — most require mixing and have working times of 15 to 30 minutes. Cost is $8 to $15 per application.
Soft spots or delaminated areas require a different approach. Catch delamination early — when you can still see clear separation without major water infiltration — and drilling small holes, then injecting epoxy-based filler works well. Drill holes slightly larger than the nozzle of your filler and inject slowly, allowing material to distribute throughout the gap. This is tedious but effective for early-stage separation. Expect to spend $20 to $40 in materials.
White osmotic blisters require flattening before sealing. The standard fix involves drilling a small hole in the blister, letting it drain, and patching. Blow out any moisture with compressed air if you have access to it. Once dry, seal the hole and surrounding area with epoxy. This prevents new water from re-entering the same spot.
For water infiltration inside the board — where the foam has absorbed saltwater — drying is the only solution. No amount of external sealing will help if moisture is trapped inside. Drill a small drainage hole in the lowest point of the board and stand it upright for several weeks. Warm, dry conditions, like a garage in summer, speed the process. Once truly dry, seal the drainage hole with epoxy.
When to stop DIY repairs: If more than 20% of the board shows damage, or if you’ve identified multiple large soft spots, professional repair is smarter. The Sound SUP repair shops in the Seattle area charge $200 to $500 for comprehensive restoration depending on damage severity. Turnaround is typically 2 to 4 weeks. This costs less than replacing a $500–$1,500 paddleboard.
Long-Term Prevention for Saltwater Paddlers
The cheapest repair is the one you never need. Saltwater degradation is cumulative and slow, which makes prevention feel optional until it isn’t.
Protective coatings extend board lifespan significantly. UV-protective wax or marine-grade board treatment coatings create a barrier against saltwater infiltration. They’re not waterproof — nothing is forever — but they slow osmotic blistering and reduce salt crystallization on the surface. Apply these annually, ideally in spring before peak paddling season. Cost runs $15 to $30 per application.
Storage practices matter year-round. Store your board indoors during months you’re not paddling actively. Seattle’s rainy season (October through May) is particularly harsh. Even if your board is fine now, storing it outside during constant moisture exposure accelerates degradation. Rack storage indoors or suspended horizontally on padded supports distributes weight evenly and prevents stress cracks.
Create an end-of-season maintenance checklist. In late September or early October, inspect your board completely. Look for cracks, blisters, and soft spots. Clean thoroughly and dry. Apply protective coating. Document any damage and repair before storage. This takes two hours and prevents six months of unattended degradation.
Check your board quarterly even during off-season storage. Just because it’s indoors doesn’t mean nothing’s happening. Look for new soft spots or blister development. Address anything new immediately before it spreads.
Finally, rinse and dry after every single session. This isn’t optional for saltwater paddling — make it as automatic as checking your phone. Your board’s longevity depends on it. I’ve now had my current board for four years with minimal damage because I committed to this simple routine. That’s three extra years compared to my first board, which translates to years of paddling and hundreds of dollars saved.
“`


Stay in the loop
Get the latest seattle paddleboard updates delivered to your inbox.