Figure Out Which Type of Board You Have First
Paddleboard leaks have gotten complicated with all the conflicting advice flying around. As someone who spent three hours trying to patch a valve on a board that actually had a cracked vent plug, I learned everything there is to know about this subject the hard way. Today, I will share it all with you.
The fix depends almost entirely on whether you’re dealing with an inflatable or a hard board. Completely different problems. Completely different solutions. Inflatables fail at valves, seams, or punctures in the PVC. Hard boards — epoxy, fiberglass, foam core — fail differently. A waterlogged hard board means the foam inside has absorbed water, which is a structural issue, not a surface one. The next two sections split these paths. Read whichever one matches your board, then jump to the emergency section when you need it fast.
Why Inflatable Boards Take On Water and How to Find the Leak
Inflatable boards fail in three main ways. Diagnosing which one is happening takes maybe five minutes at your kitchen sink — at least if you have a spray bottle handy. So, without further ado, let’s dive in.
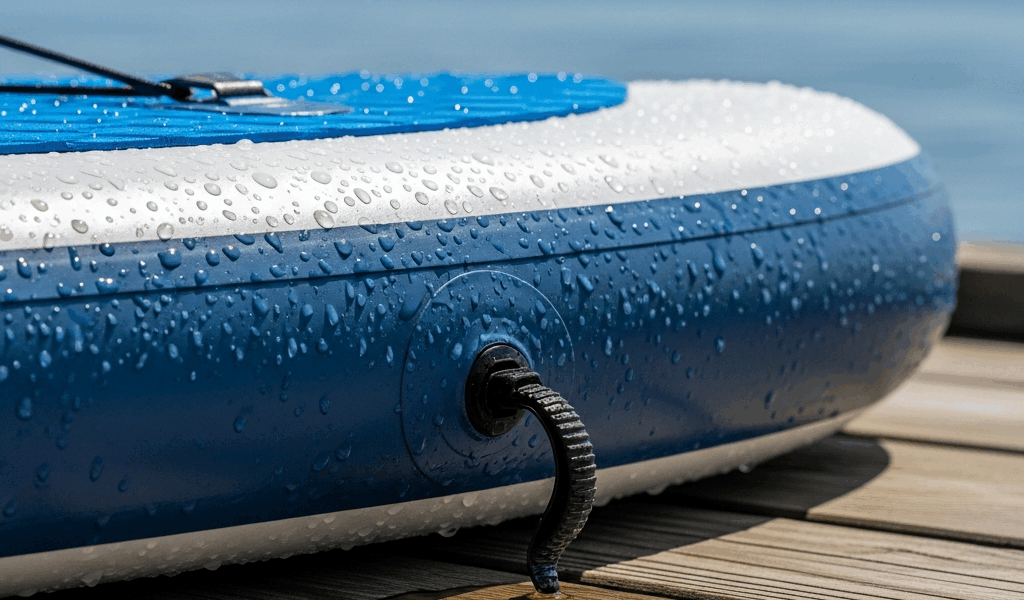
The Halkey-Roberts Valve — Most Common Culprit
But what is a Halkey-Roberts valve? In essence, it’s that brass fitting sitting dead center on your board. But it’s much more than that — it’s usually the first thing to go wrong and the last thing people think to check.
A board that inflates fine but slowly goes soft overnight is almost always a valve problem, not a seam failure. The O-ring inside degrades. The stem loosens. Grab the valve wrench — it’s usually rattling around loose in the box or tucked into the repair kit — and tighten the stem clockwise. Half a turn sometimes fixes everything. I’m apparently someone who skipped this step for two full seasons and just kept reinflating every morning. Don’t make my mistake.
Fill a spray bottle with soapy water. Spray it directly over the valve. Bubbles forming within ten seconds? You found your leak. This test is reliable. Use it every time.
Seam Delamination Along the Rails
The rails — those lengthwise edges running down both sides — are glued together with a joint that hates heat, UV exposure, and repeated flexing. Delamination usually starts at a corner and creeps slowly inward. You’ll notice the two PVC layers beginning to separate, sometimes with white glue residue or slight discoloration along the edge.
Run the soap-water spray along this area too. Bubbles mean the seal is gone. A small separation might survive a few more sessions on the water. It will get worse regardless. That’s what makes catching this early so valuable to us paddlers who’d rather not haul a dying board back from the put-in.
Pinhole Punctures in the Drop-Stitch Material
You hit a rock. Dragged it across gravel in the parking lot. Stepped on it wrong near a fin box. These punctures are usually tiny — almost invisible until the board is already half-deflated mid-session. The good news: they’re the easiest to find and fix at home.
Inflate the board fully. Work the soap-water spray systematically across the entire bottom and both sides. Pay attention around foot zones and any visible scuffs or discoloration. Mark any bubbling spots immediately with a waterproof marker — specifically a Sharpie works fine — because they’re easy to lose once you move the board.
Why Hard Boards Take On Water and What It Means
Hard boards — fiberglass, epoxy, carbon fiber — hold water internally once the foam core gets saturated. A waterlogged board loses buoyancy noticeably, feels dramatically heavier even lifting it onto your car, and sometimes makes a sloshing sound when you rotate it. Occasionally water sprays visibly out of a crack when you paddle. None of this is subtle once it’s progressed.
The Vent Plug — Check This First
Probably should have opened with this section, honestly. The vent plug is a small rubber or plastic cap — usually sitting near the deck pad or along the rails — and its entire job is letting air move in and out as the board flexes and internal pressure shifts. When it cracks, clogs with salt and sand, or pops off entirely, water seeps in around it freely.
Walk over to your board right now. Find it. Unscrew or pry it off. If it looks cracked, crusty, or isn’t there at all, replace it. A new vent plug runs around $4 to $7 depending on the brand. This single swap solves probably thirty percent of every “hard board taking on water” situation I’ve seen paddlers dealing with.
Cracks in the Deck or Rails
Hard falls happen. Storage straps apply pressure over months. UV exposure slowly degrades fiberglass over years sitting in a sunny garage. The shell cracks. Water finds the opening — it always does — and works into the foam below. This isn’t always visible immediately, especially if the crack runs under the deck pad.
Run both hands over the entire board slowly, focusing on the rails and the edges where the deck pad meets bare fiberglass. Feel for soft spots or sponginess. Press gently in suspicious areas — waterlogged foam feels distinctly different from solid dry fiberglass.
Delamination from the Foam Core
The outer fiberglass shell separates from the internal foam layer. Water fills the gap between them. The board gets heavier, the structure weakens, and the damage spreads faster than you’d expect. You’ll notice white foam peeking out from edges, or a distinctly squishy response when you press on the deck. This requires professional repair. A shop will open the board, dry it out in an oven — seriously, they have actual board-drying ovens — and re-bond the layers properly. Don’t attempt this one at home.
Emergency Fixes You Can Do on the Water
You’re already out. Water is getting in. You need to get back safely without overthinking it.
For Inflatables
Use your hand pump — you brought it, right? — to top off pressure. If the valve wrench is in your kit, try tightening the stem quickly. Don’t spend more than two minutes troubleshooting out there. Head to shore immediately. Water temperatures in the Pacific Northwest hover around 50°F even in July, and hypothermia doesn’t care how good a paddler you are.
For Hard Boards
Water actively pooling inside or spraying from a crack means you return to shore right now. No diagnosing, no waiting. A rapidly sinking hard board is not a problem you paddle your way out of.
How to Properly Repair the Leak at Home
Inflatable Repair
While you won’t need a full workshop setup, you will need a handful of basic supplies — specifically PVC cement, a patch, and sandpaper. Most repair kits include all three. Clean and roughen the area around the leak with the sandpaper. Apply PVC cement — Aqua Seal and Stormsure both work well here, and I’m apparently an Aqua Seal person while Stormsure never quite bonded right for me — to both the patch and the board surface. Press firmly and hold for two to three minutes minimum. Let it cure fully, at least 24 hours, preferably 48, before you put it on water again.
Valve replacements are a separate process. Order a Halkey-Roberts valve kit sized specifically for your board — these typically run $20 to $35 depending on the source — and follow the manufacturer’s instructions carefully. Doable in a garage on a Saturday morning. Just patient work.
Hard Board Repair
Solarez UV resin might be the best option for small cracks and dings, as hard board repair requires a fast-curing solution without heat mixing. That is because fiberglass repairs done improperly trap moisture rather than seal it out. Clean the crack thoroughly, fill it with Solarez, and set the board in direct sunlight for 15 minutes to an hour depending on the product version. Sand smooth once cured.
A cracked vent plug is a straight swap. Order the replacement, screw it in, done. That’s the whole repair.
Delamination and saturated foam cores go to a shop. Wet foam never fully dries on its own sitting in your garage — never. Patching over it just traps the moisture inside and accelerates the damage.
Prevention Matters
Rinse both board types with fresh water after every saltwater session. Store inflatables partially deflated — not fully, not completely flat — to ease pressure on the seam adhesive. Keep hard boards out of direct UV when they’re not in use. A basic board bag or shaded corner of the garage makes a genuine difference over years. Check the vent plug before each session. Tighten the valve every month.
Small maintenance stops leaks before they start. That’s the whole game.


Stay in the loop
Get the latest seattle paddleboard updates delivered to your inbox.